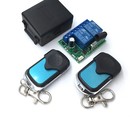
Universal Wireless Remote Control Switch DC 12V 2CH
2 Remotes
Product Code: MOD0235
Set to momentary
Remote 1 relay 1
Remote 2 relay 2
Product SPECIFICATION:
Input Power: DC 12V
Standby Current: <5MA
RF Frequency: 433M
RF working mode: superheterodyne
Receive sensitivity: >97dbm
Transmitting distance: 50 meters above
Decoding mode: MCU software decoding
Remote storage: 20 pcs
Support remote type: Learning code, Fixed code(Rolling code can be design)
Working mode: Momentary, Toggle, Latching Time delay (5s ,10s ,15s )
Wiring type: fixed terminal
Output Terminal: NO , NC , COM
Additional Remote:
Additional remotes can be codeded and added to this module see MOD0215
You can set the Remote Control to operate in 4 modes:
Momentary/Jog
Press and hold one key->ON; Release the key->OFF
Toggle/Self-Lock
Press one Key->ON; Press the same key again->OFF
Latched/Inter-Lock
Press one Key once->ON; Press another key once->OFF
Time delay mode
Press and hold one key->ON; Release the key->OFF(after 5 seconds, or 10 seconds, or 15 seconds, 3 ways of the time delay can be chosen)
How to Delete the existing remote controls data?
Press the learning key on the Receiver Switch Module board 8 times, then wait for the LED indicator on the board flash for 7 times, the existing data are deleted successfully. ( if the LED indicator on the board doesn’t Flash, Please check the Power Supply status, make it right, and try more times)
How to Set the Remote Mode:
1-Momentary/Jog Mode:
Press the learning key on the Receiver Switch Module board once , The ON-board Led indicator will Flash simultaneously .
Then press any of the remote key (Or which one your want to use) , the on-board LED indicator will flash 5 times to inform that the setting of momentary mode is successful .
2-Toggle/Self-Lock:
Press the learning key on the Receiver Switch Module board 2 times.The ON-board Led indicator will Flash simultaneously .Then press any of the remote key (Or which one your want to use) , the on-board LED indicator will flash 5 times to inform that the setting of toggle mode is successful .
3-Latched/Inter-Lock:
Press the learning key on the Receiver Switch Module board 3 times.The ON-board Led indicator will Flash simultaneously .
Then press first remote key (Like Key A), then press the a second Key (Like Key B), the on-board LED indicator will flash 5 times to inform that the setting of latched mode successful . The first pressed key stands for on(Like Key A ), and the second pressed Key stands for off (Like Key B).
4-Time Delay
Press the learning key on the Receiver Switch Module board forth times, the time delay for 5 seconds .
Press the learning key on the Receiver Switch Module board fifth times, the time delay for 10 seconds .
Press the learning key on the Receiver Switch Module board sixth times, the time delay for 15 seconds .
The LED indicator will be off after the learning key operations.
Then Press one of the remote keys, LED flashes and turn off .
After 3 seconds, the LED indicator will be on again, delay mode set successfully .
MODULE

The Bits that Count! Surplustronics sells masses of Arduino boards and other pre-made modules ready for your project. These come under the MODULE brand which is exclusive to Surplustronics. While much of this can be purchased online from overseas, we carry huge stocks right here in Auckland and your...


